Building a secure B2B React/Express app with PropelAuth

In this guide, we’ll build a simple B2B application with authentication. B2B applications allow your end-users to create organizations, manage roles within the organization, and invite users to the organization. This is also commonly called multi-tenant authentication.
The application will allow users to sign up/login, create/manage organizations, and logged-in users will see their organizations.
Hosted auth with PropelAuth#
PropelAuth is a hosted authentication service focused on a great developer experience.
Follow the steps here to set up your project and make sure to select B2B as each user is not a member of an organization. For our hosted pages, we’ll use the primary color rgb(109, 73, 71) and this logo:
Setting up our React frontend#
After setting up our project, our users can log in, but there’s nothing to do once they log in. So let’s continue by creating a UI. This UI will need a few components:
- Login/signup buttons if the user is NOT logged in
- Organization management and logout buttons if the user is logged in
- Display the user’s organizations and their role
- Display a message that’s the result of hitting an API which we’ll implement later on
Creating our React app#
To create a new React application, we will use create-react-app, following the official
instructions here.
$ npx create-react-app frontend
$ cd frontend
$ yarn start  # or npm start
Configuring PropelAuth#
Go to your PropelAuth project and click Frontend Integration in the sidebar. You will see:
- Port - The port your app runs on locally. The default for React is 3000. After entering
3000, your test environment will only accept requests fromhttp://localhost:3000. - Login Redirect Path - After a user logs in, they will be redirected here. For example,
/will redirect them tohttp://localhost:3000/. - Logout Redirect Path - After a user logs out, they will be redirected here.
- Auth URL - This is where your authentication pages are hosted, and you will need this for the next step.
Click Save, and PropelAuth will now accept requests from your frontend. If you log in, you will now be redirected
to http://localhost:3000/.
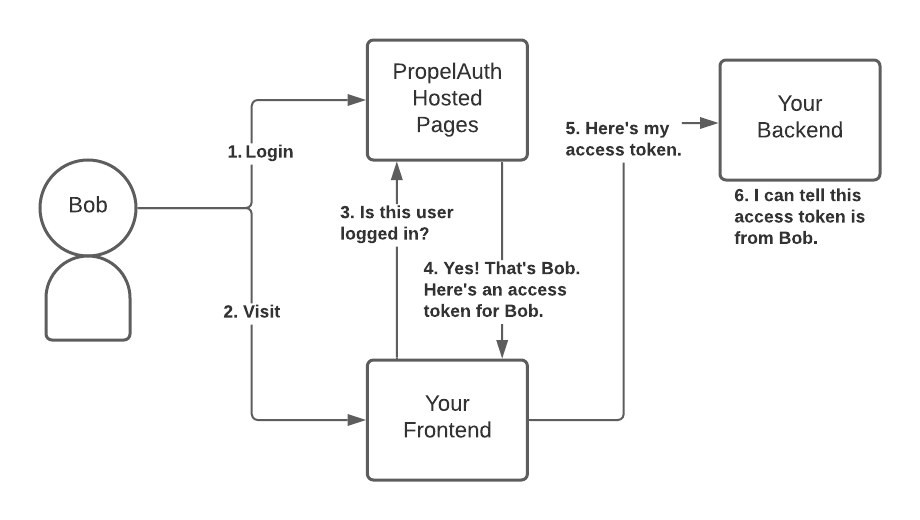
How does authentication work?#
How will our frontend and backend know if the current user is logged in? PropelAuth’s authentication is token-based. A token is a string that uniquely identifies a user, and we refer to these tokens as access tokens (since they give your users access to your APIs).
Your frontend will request a token from PropelAuth on behalf of a user.
PropelAuth returns access tokens only for valid logged-in users. Later on, when your frontend makes requests to your backend, it will include an access token, which your backend can validate and determine whose token it is.
This complexity is hidden in PropelAuth’s React library (including annoying things like storing the token, periodically refreshing the token, etc.).
Adding authentication#
We’ll need to install the library first:
$ yarn add @propelauth/react
# or npm install --save @propelauth/react
AuthProvider manages our user’s authentication information, so it’s best to put it at the top level of our application, so it never unmounts.

import {AuthProvider} from '@propelauth/react';

ReactDOM.render(
    <AuthProvider authUrl="https://REPLACE_ME.propelauthtest.com">
        <App/>
    </AuthProvider>,
    document.getElementById('root')
);
The authUrl is the value we saw on the Frontend Integration page earlier.
App and any child components may now access authentication information.
To demonstrate this, let’s set up our signup, login, and logout buttons based on whether the user is logged in.
import {withAuthInfo, useLogoutFunction, useRedirectFunctions} from '@propelauth/react';

function AuthenticationButtons(props) {
    const logoutFn = useLogoutFunction()
    const {redirectToSignupPage, redirectToLoginPage} = useRedirectFunctions()

    if (props.isLoggedIn) {
        return <button onClick={logoutFn}>Logout</button>
    } else {
        return <div>
            <button onClick={redirectToSignupPage}>Signup</button>
            <button onClick={redirectToLoginPage}>Login</button>
        </div>
    }
}

// The AuthProvider only needs to load auth info once
// We can optionally specify a component to display while loading
export default withAuthInfo(AuthenticationButtons, {
    displayWhileLoading: <div>Loading...</div>
})
import AuthenticationButtons from "./AuthenticationButtons";

export default function App() {
    return <AuthenticationButtons/>
}
Your app should now look like this:

Managing organizations#
Since we are making a B2B application, we want our end users to:
- Create organizations
- Invite new users to their organizations
- Manage the roles of users within their organizations
All of that is actually already done for you on your hosted pages. Sometimes, we also want to display organization information within our application. We’ll build a quick proof of concept to show what you can do.
This proof of concept includes:
- List all the current user’s organizations, including their role
- Clicking an organization lets you invite new users and manage existing users
- A button which allows you to create new organizations
import {useRedirectFunctions, withAuthInfo} from "@propelauth/react";

function OrganizationView(props) {
  const {redirectToCreateOrgPage} = useRedirectFunctions()

  if (!props.isLoggedIn) {
    return <div>Login to view organizations</div>
  }

  // Get user's orgs and display them in a bulleted list
  const orgs = props.orgHelper.getOrgs();
  return <div>Your Orgs:
    <ul>{orgs.map(org =>
            <li key={org.orgId}>
              <Org org={org} />
            </li>
    )}</ul>
    <button onClick={redirectToCreateOrgPage}>Create Org</button>
  </div>
}

// Display an individual org
// Clicking on it redirects to the org management page
function Org({org}) {
  const {redirectToOrgPage} = useRedirectFunctions()

  // Clicking will direct you to the hosted org management page
  return <a href="#" onClick={() => redirectToOrgPage(org.orgId)}>
    {JSON.stringify(org)}
  </a>
}

export default withAuthInfo(OrganizationView);
As you can see, useAuth also provides an
orgHelper
which has a lot of useful functions for managing organizations. For example, we called orgHelper.getOrgs() to get
the users' organizations.
Then we hook it up in the App:
import AuthenticationButtons from "./AuthenticationButtons";
import OrganizationView from "./OrganizationView";

export default function App() {
    return <div>
        <AuthenticationButtons/>
        <OrganizationView/>
    </div>
}
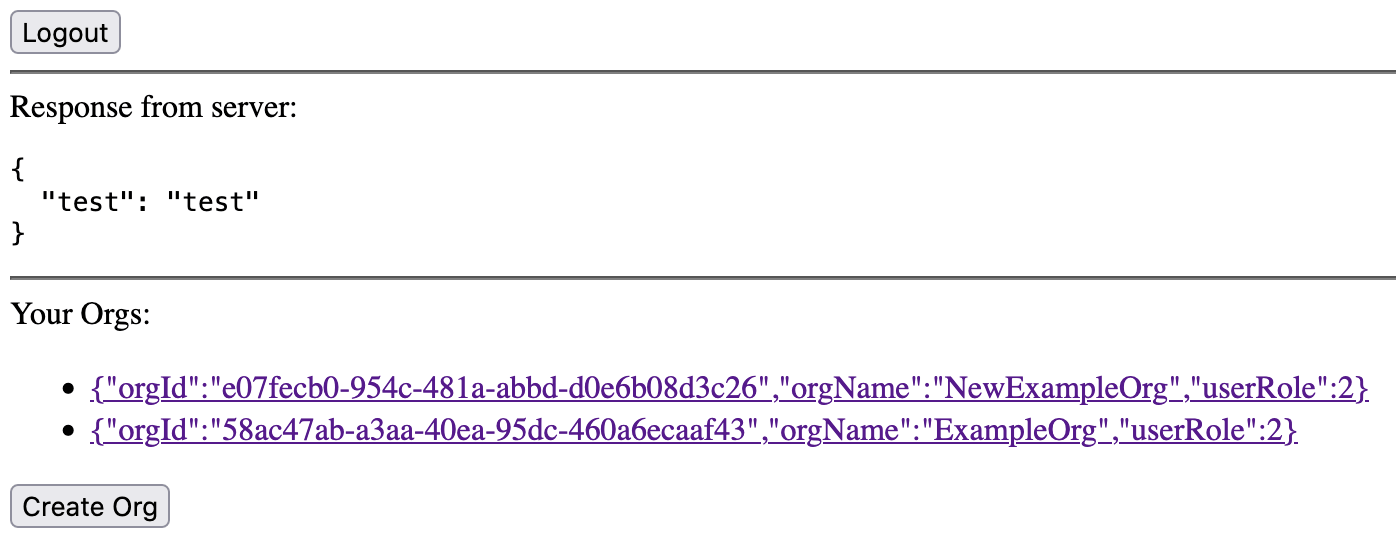
Your application should now look like this:
Note that userRole is an enum which is displayed as an integer. See
the reference for more information.
Selecting an org
In most applications, a user only interacts with a single organization at a time. orgHelper.selectOrg(orgId) allows
us to choose an organization that we can later fetch with orgHelper.getSelectedOrg(inferDefault).
Inferring a default will intelligently select an organization if the user hasn’t explicitly picked one yet.
Making authenticated requests#
There are a lot of ways to make HTTP requests in Javascript. You could use the Fetch API, XMLHttpRequest, or a library like axios.
Whichever you choose, to make an authenticated request on behalf of your user, you’ll need to provide an access
token. Just like isLoggedIn, the access token is available from
withAuthInfo. You provide it in the request in the Authorization
header, like so:
Authorization: Bearer YOUR_ACCESS_TOKEN
With the Fetch API, this looks like:
function whoAmI(accessToken) {
    return fetch("/whoami", {
        method: "GET",
        headers: {
            "Authorization": `Bearer ${accessToken}`,
        }
    })
}
We’ll move the fetch and some processing logic into its own file:
// Make a GET request to /api/whoami, return the response as pretty JSON
export function fetchApiWhoami(accessToken) {
  return fetch("/api/whoami", {
    method: "GET",
    headers: {
      "Content-Type": "application/json",
      "Authorization": `Bearer ${accessToken}`,
    }
  }).then(response => handleResponseOrError(response))
}

function handleResponseOrError(response) {
  if (response.ok) {
    return response.json()
            .then(json => prettyJsonStringify(json));
  } else {
    return Promise.resolve(prettyJsonStringify({"errorStatus": response.status}))
  }
}

function prettyJsonStringify(jsonResponse) {
  return JSON.stringify(jsonResponse, null, 2);
}
Using this in a component alongside withAuthInfo, we get:
import {useEffect, useState} from "react";
import {withAuthInfo} from "@propelauth/react";
import {fetchApiWhoami} from "./FetchHelper";

function ComponentThatCallsAnApi(props) {
    const [loading, setLoading] = useState(true);
    const [response, setResponse] = useState("");

    // When the component mounts or our token changes, make a GET request to /api/whoami
    useEffect(() => {
        fetchApiWhoami(props.accessToken)
            .then(response => setResponse(response))
            .finally(() => setLoading(false));
    }, [props.accessToken]);

    if (loading) {
        return <div>Loading...</div>
    }
    return <div>
        Response from server:
        <pre>{response}</pre>
    </div>
}

export default withAuthInfo(ComponentThatCallsAnApi);
Finally, let’s hook it up to our App:
import AuthenticationButtons from "./AuthenticationButtons";
import ComponentThatCallsAnApi from "./ComponentThatCallsAnApi";
import OrganizationView from "./OrganizationView";

export default function App() {
  return <div>
    <AuthenticationButtons/><hr/>
    <ComponentThatCallsAnApi/><hr/>
    <OrganizationView/>
  </div>
}
Our fetch will error until we set up our backend, so let’s do that now.
A quick note on ports#
Our React application runs on port 3000, so we’ll need to run Express on a different port (in this tutorial, we use
3001). For security reasons, browsers will not allow you to make requests from one domain to another,
and http://localhost:3000 and http://localhost:3001 are considered different domains.
A simple way to fix this issue is to add the following to your package.json:
"proxy": "http://localhost:3001"
This will automatically proxy certain requests (like JSON requests) to http://localhost:3001. For more information, see the official React docs.
Setting up our Express backend#
Our frontend is expecting to hit an endpoint /api/whoami and display the response to the user.
Creating an unprotected route#
First we create our express project
$ mkdir backend # create a new project
$ cd backend
$ yarn init     # initialize the project
# or npm init
$ yarn add express
# or npm install --save express
Then, we’ll create an unprotected endpoint.
const express = require('express')
const app = express()
const port = 3001

app.get('/api/whoami', (req, res) => {
    // TODO: return something useful
    res.json({'test': 'test'});
})

app.listen(port, () => {
    console.log(`Example app listening at http://localhost:${port}`)
})
Run this with node index.js and test it by refreshing our React app.
Protecting our API#
At this point, our frontend is passing in an access token, but our server isn’t doing anything with it yet. We’ll use
PropelAuth’s Express library @propelauth/express to get the user.
$ yarn add @propelauth/express # or npm install --save @propelauth/express
Let’s look at the code that protects our API first and then break down what each step does:
const propelAuth = require('@propelauth/express');
module.exports = propelAuth.initAuth({
    debugMode: true,
    authUrl: 'https://REPLACE_ME.propelauthtest.com',
    apiKey: 'REPLACE_ME'
})
const {requireUser} = require("./propelauth");

app.get('/api/whoami', requireUser, (req, res) => {
    res.json({'user': req.user});
})
- requireUser is
an Express middleware
that validates the access token, and sets
req.userif a valid token was provided. If a valid token wasn’t provided, it will return a401 Unauthorizederror. If you want the request to continue even without a valid access token, use optionalUser instead. debugModeprints out useful error messages when things go wrong.authUrlandapiKeycan both be found by clicking on Backend Integration on the sidebar of your PropelAuth project. These are used once on startup to fetch the information needed to validate tokens. Access tokens are then validated quickly without needing to make any external requests.
Finally, we can login and check our application:
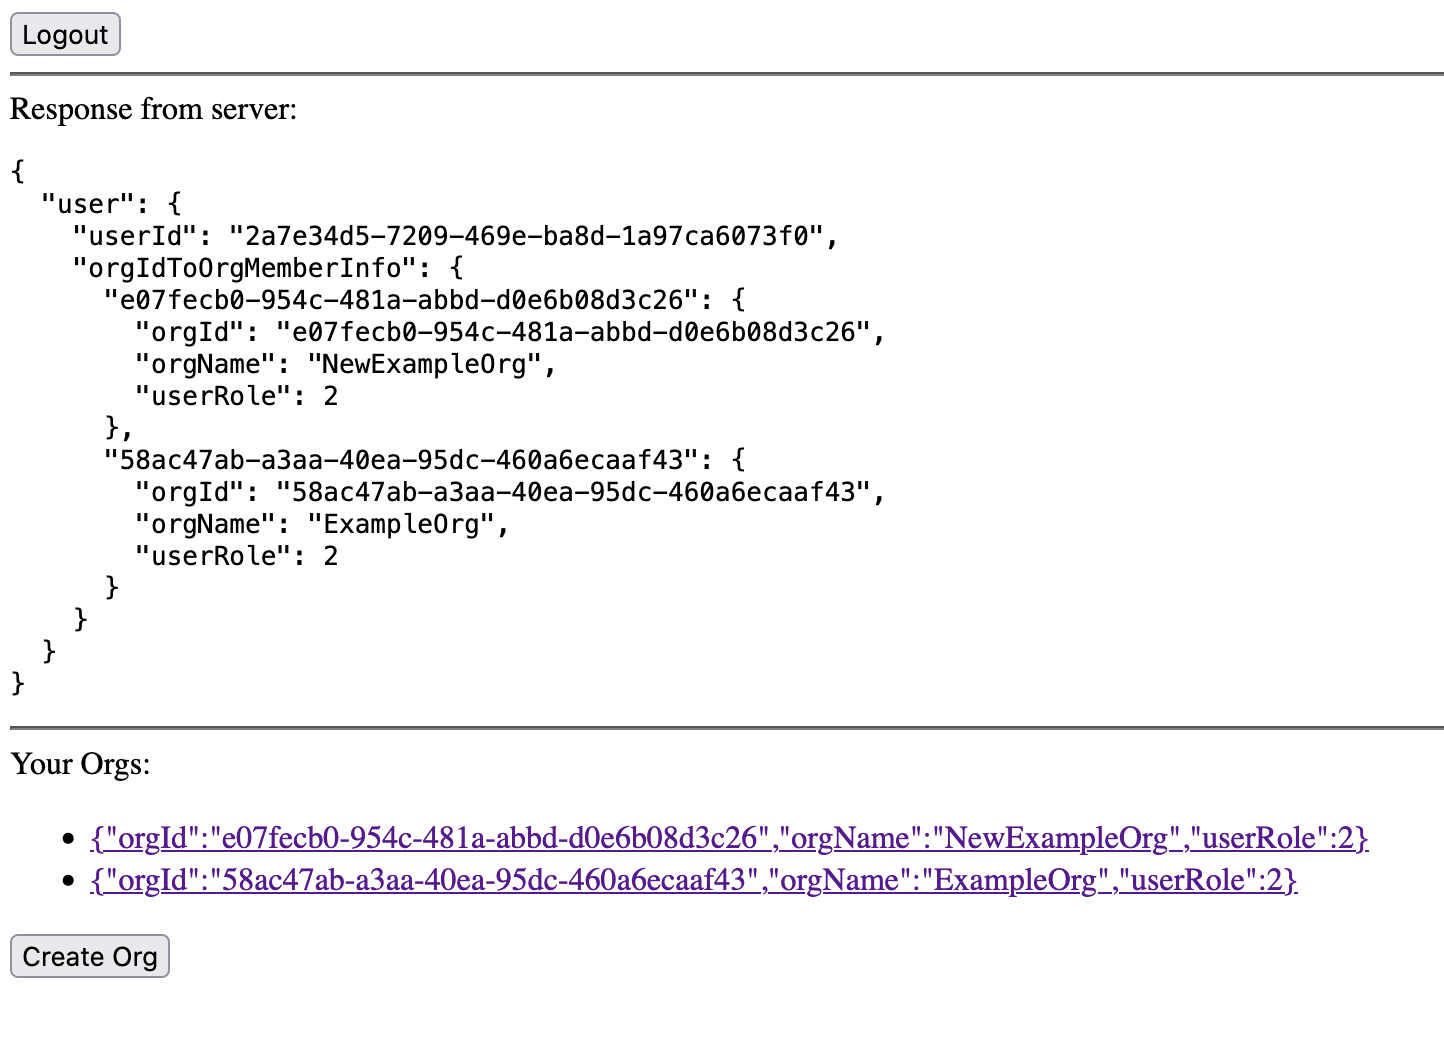
Organization access#
The JSON on the user object contains every organization the user is a member of. Typically, your users will only interact with a single organization at a time.
If you want to check if a user has access to a specific organization, you can use the requireOrgMember middleware instead of requireUser. requireOrgMember will still check the provided credentials, but it will also check their organization membership and it can optionally check their role within the organization.
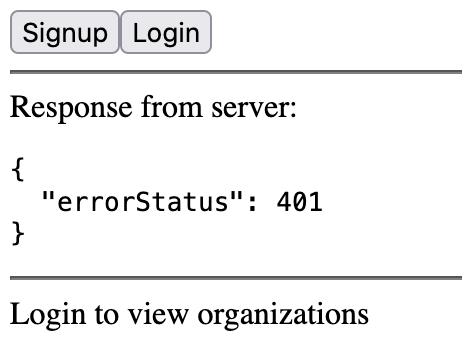
Wrapping up, when we logout, we see:
Summary#
Success! Our frontend made a request to our backend, and our backend was able to identify the user that made the request.
You can use this for things like saving information in a database per user_id. You can also use additional middleware like
requireOrgMember to verify that the user is a member of a
specific organization.
If you have any questions, please reach out at support@propelauth.com.