Adding Authentication to a React / Express application with PropelAuth
This guide will take an application built without authentication and show how to add it with PropelAuth.
The application we will update is a comment system. Users can post comments and enter a username along with their posts.
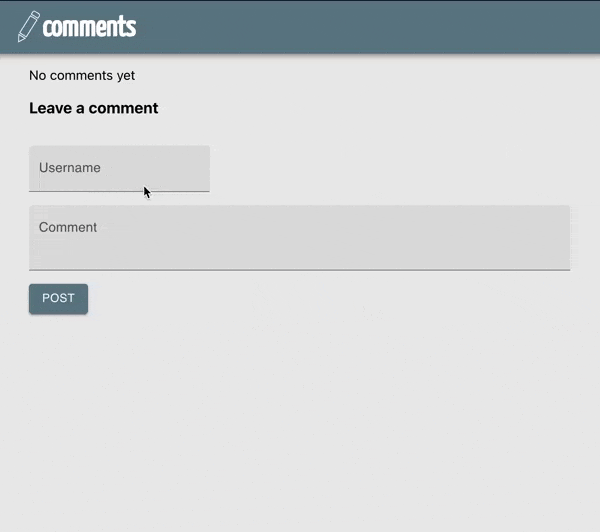
Our final application will require the user to login to post.
Technologies used#
- React for the frontend
- Material UI to style the frontend
- SWR for loading data
- Express for the backend
- Sequelize to interact with the database
- Sqlite for our database
- PropelAuth for authentication
Existing app overview#
The complete code for the application before authentication is available here. In this section, we’ll only display a few critical parts of the codebase.
Frontend#
The frontend is made up of two key components. frontend/src/component/Comments.js fetches a list of comments from the
backend and displays them. To fetch the comments, we use SWR:
function Comments() {
    const {data: comments, error} = useSWR("/comments", fetcher)
    // ... comments is an array of comments to display
where fetcher is defined in frontend/src/api/api.js:
export const fetcher = (url) => {
    return fetch(url, {
        method: "GET",
        headers: {
            "Content-Type": "application/json",
        },
    }).then((response) => response.json())
}
The other key component is frontend/src/component/CreateComponent.js which displays two text boxes, one for a username and one
for a comment. When the user submits, we make a POST request to our backend to create the comment:
fetch("/comments", {
    method: "POST",
    headers: {
        "Content-Type": "application/json",
    },
    body: JSON.stringify({
        username: username,
        text: text,
    }),
});
Backend#
Our Express backend exposes the two endpoints we saw on the frontend. One for listing the comments and one for creating them:
const app = express()
const port = 3001
app.use(express.json())

app.get("/comments", async (req, res) => {
    const comments = await listAllComments()
    res.json(comments)
})

app.post("/comments", async (req, res) => {
    // ... Validate the request
    await createComment(req.body.username, req.body.text)
    res.status(200).send()
})
DB Schema#
Our DB schema is defined in Sequelize (backend/src/db.js):
const Comment = sequelize.define(
    "Comment",
    {
        id: {
            primaryKey: true,
            type: DataTypes.UUID,
            allowNull: false,
            defaultValue: Sequelize.UUIDV4,
        },
        text: {
            type: DataTypes.TEXT,
            allowNull: false,
        },
        username: {
            type: DataTypes.TEXT,
            allowNull: false,
        },
    },
    {
        timestamps: true, // add createdAt and updatedAt
    }
)
or put simply, it’s a single table with 5 columns:
- id - an autogenerated UUID
- text - the text of the comment
- username - the username that submitted the comment
- createdAt - an autogenerated timestamp when the row is created
- updatedAt - a timestamp that sequelize updates when the row is updated
Adding authentication#
The code diff for adding authentication is available here.
Setting up PropelAuth#
PropelAuth is a hosted authentication service. Its hosted authentication pages are a configurable UI which your users use to sign up, login, manage their accounts, and (for B2B cases) manage their organizations. In addition, its libraries hide the complexity of authentication, so you don’t have to worry about becoming an expert to add auth to your application.
Follow the steps here to set up your project and make sure to select B2C as each user is not a member of an organization.
We’ll use the following settings for our hosted authentication pages:
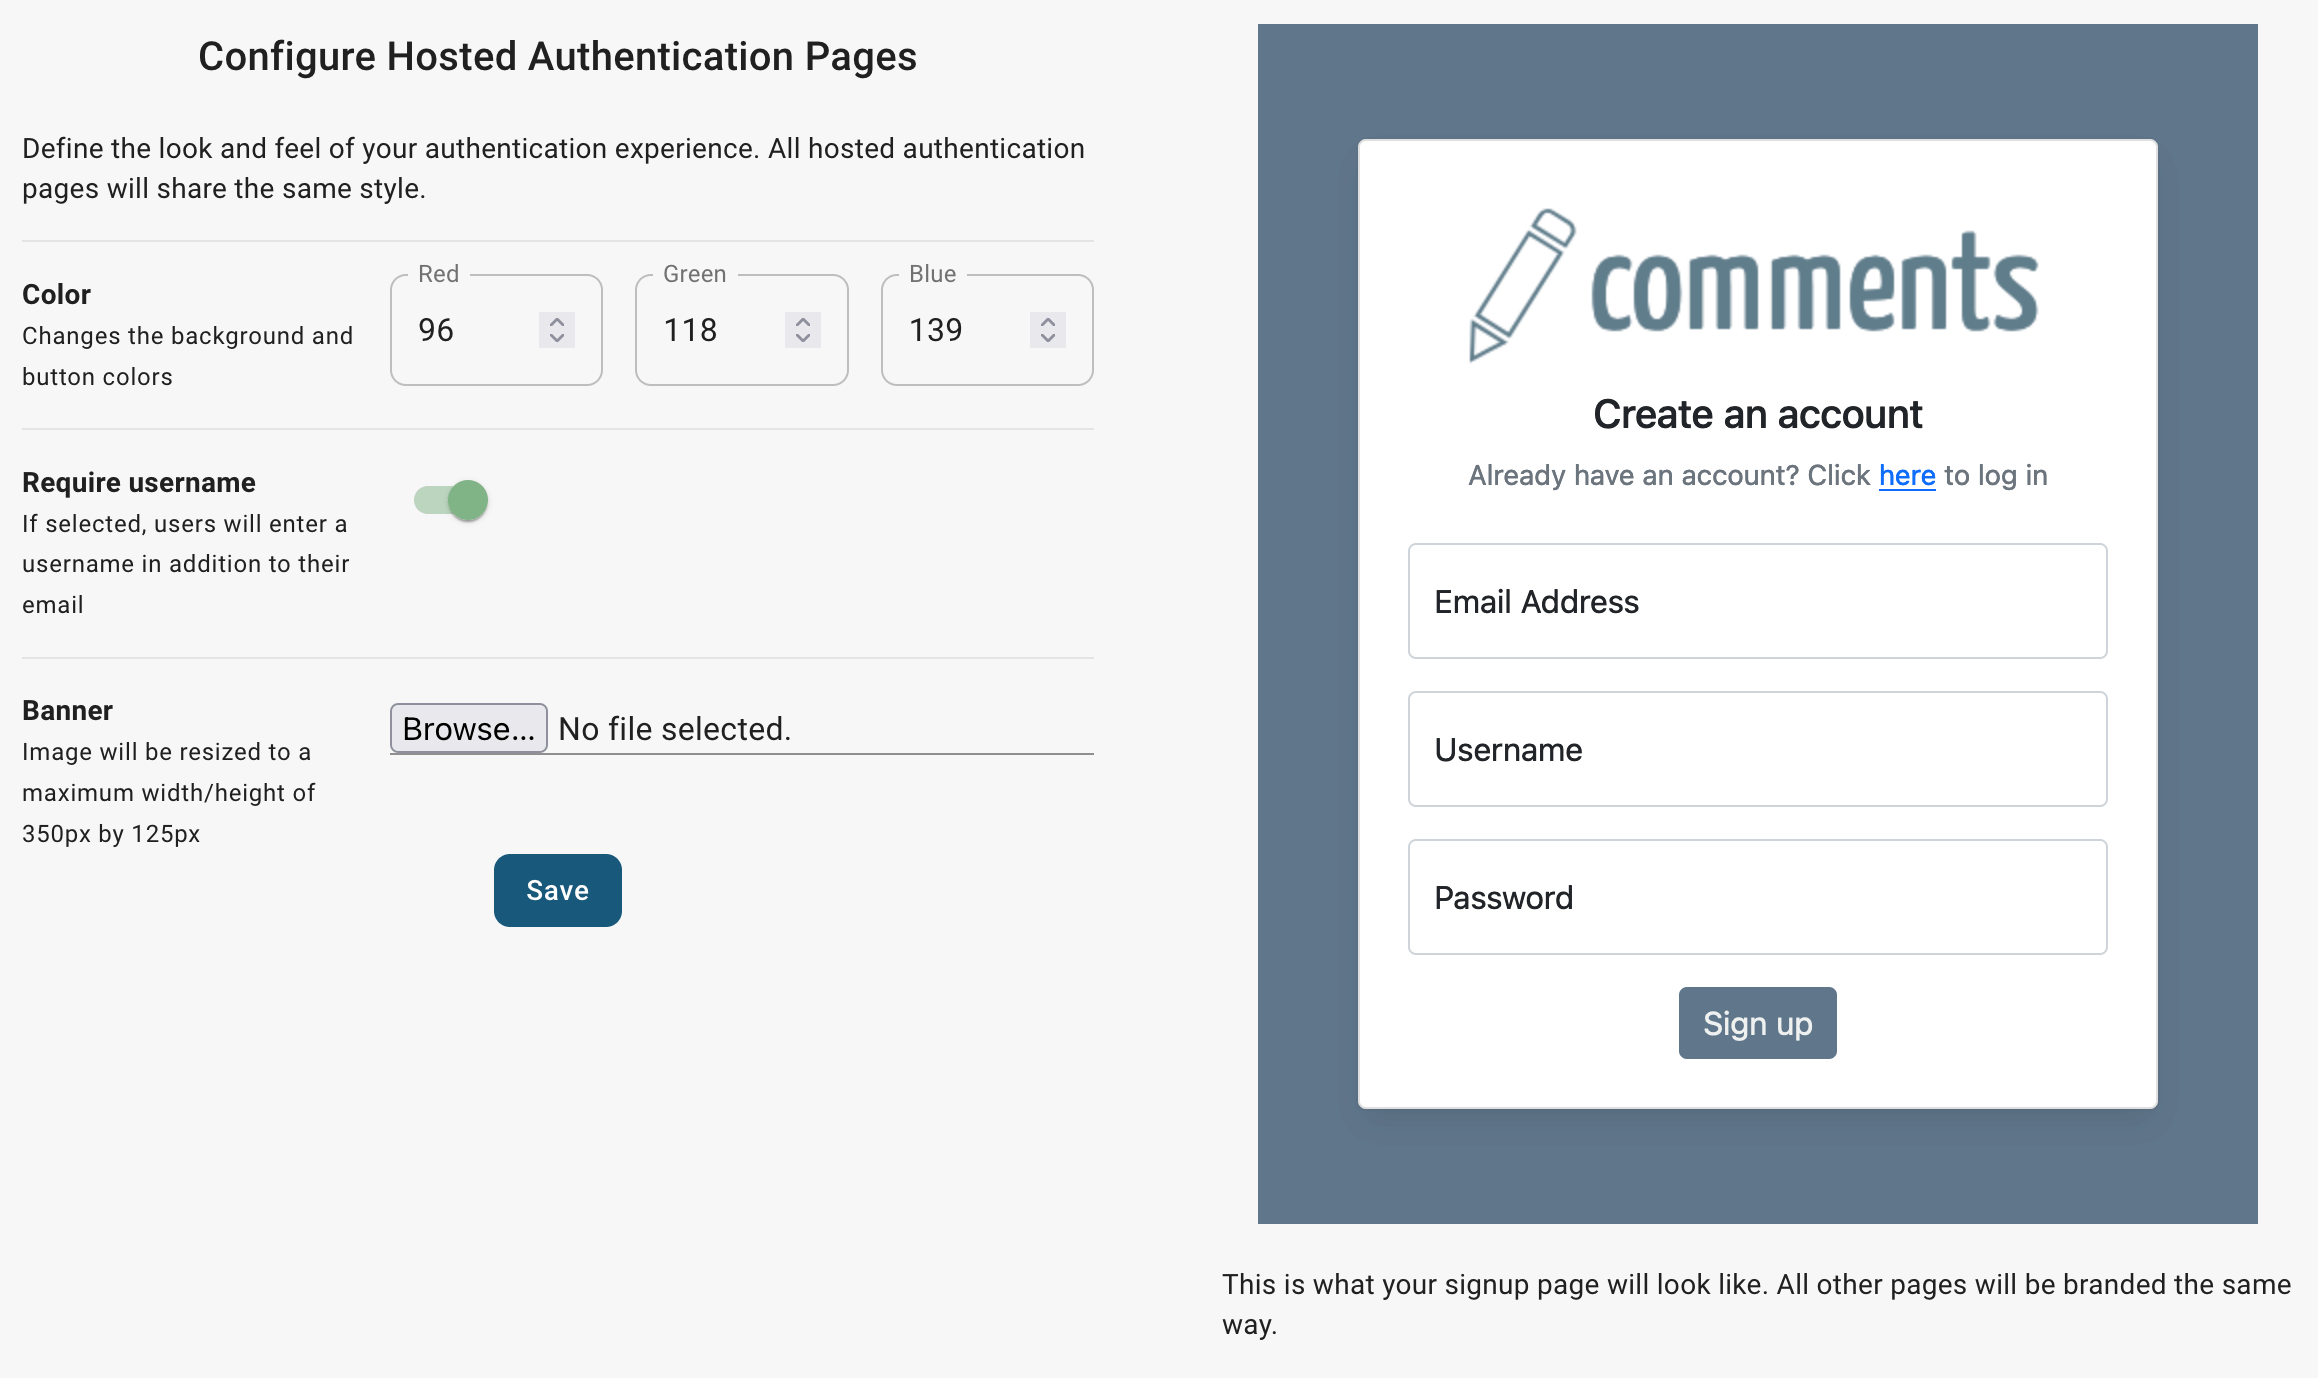
which uses this Banner image:
And now we have a full authentication experience for our users. They can sign up, change their usernames, update/reset their passwords, etc.
Integrating with PropelAuth#
We’ll need to integrate our existing app with PropelAuth, but what does that mean?
If you think about the changes we need to make, we need our frontend/backend to do a few key things:
- [Frontend] Determine if the current user is logged in
- [Frontend] Send an HTTP request to the backend as the current user
- [Backend] Securely understand which user made a given HTTP request
Securely is an important word in the last bullet. In our original application, the backend technically “understood” which user made a request, but everyone could pretend to be anyone by passing a random username. We’ll want to make sure that only valid users can make create comments, and each comment references the user that made it.
Token-based authentication#
PropelAuth uses a token-based approach. A token is a string that uniquely identifies a user, and we refer to these tokens as access tokens (since they give your users access to your APIs).
Under the hood, these access tokens are JWTs (or JSON Web Tokens). At a high level, JWTs contain metadata that answers questions like “which user is this token for” and “how long is this token valid for.” JWTs also are signed, meaning we can verify that it hasn’t been tampered with and only the person with the key can create them (in this case PropelAuth).
JWTs can be complicated, but ultimately, all you need to know is that accessTokens are strings that our React frontend can fetch from PropelAuth for the current user. Our Express backend can validate and determine which user made the request.
Updating our frontend#
Configuration#
You have two separate auth environments (test and production). You’ll need to tell PropelAuth which URL requests will come from for each environment.
Go to the Frontend Integration section of your PropelAuth project. For our test environment, we specify a port
on localhost to expect requests to come from. The default for React is 3000.
Setup#
Install PropelAuth’s React library:
$ cd frontend
$ yarn add @propelauth/react
# or npm install --save @propelauth/react
AuthProvider manages our
user’s authentication information, so it’s best to put it at the top level of our application, so it never unmounts.
We’ll update frontend/src/index.js.
import {AuthProvider} from '@propelauth/react';

ReactDOM.render(
    <React.StrictMode>
        <AuthProvider authUrl="REPLACE_ME">
            <App />
        </AuthProvider>
    </React.StrictMode>,
    document.getElementById("root")
)
The authUrl is the value we saw on the Frontend Integration page earlier.
App and any child components may now access authentication information.
Displaying Login/Logout in the App Bar#
When a new user comes to the site, we want them to see login/sign up buttons in the App bar.

After they login, we want them to see logout/account buttons.

Let’s look at the code for this and break it down after:
import Button from "@mui/material/Button"
import { withAuthInfo, useLogoutFunction, useRedirectFunctions } from "@propelauth/react"

function AuthenticationButtons({isLoggedIn}) {
    const logoutFn = useLogoutFunction()
    const {
        redirectToSignupPage, redirectToLoginPage, redirectToAccountPage
    } = useRedirectFunctions()

    if (isLoggedIn) {
        return <div>
            <Button color="inherit" onClick={redirectToAccountPage}>Account</Button>
            <Button color="inherit" onClick={logoutFn}>Logout</Button>
        </div>
    } else {
        return <div>
            <Button color="inherit" onClick={redirectToSignupPage}>Signup</Button>
            <Button color="inherit" onClick={redirectToLoginPage}>Login</Button>
        </div>
    }
}

export default withAuthInfo(AuthenticationButtons)
- useLogoutFunction is a React hook which returns a function that logs the current user out.
- useRedirectFunctions is a React hook which returns functions that redirect the user to different hosted pages.
- withAuthInfo is a React higher-order function.
It passes in auth information for the current user like
isLoggedInandaccessTokento the wrapped component. In this case we only neededisLoggedIn.
Making an authenticated HTTP request#
To make an authenticated request on behalf of your user, we’ll need to provide an access
token. We provide it in the request in the Authorization header, like so:
Authorization: Bearer YOUR_ACCESS_TOKEN
Let’s update the createComment function (in frontend/src/api/api.js) from earlier to pass in an accessToken
instead of a username.
// Replace username with accessToken
export const createComment = async (accessToken, text) => {
    const response = await fetch("/comments", {
        method: "POST",
        headers: {
            "Content-Type": "application/json",
            // accessTokens are passed in the header
            "Authorization": `Bearer ${accessToken}`
        },
        body: JSON.stringify({
            text: text,
        }),
    });
    // ...
}
Note that while we can get a username on the frontend (withAuthInfo also provides a user prop into the
wrapped component), passing in a username is not a secure solution. Someone can, for example, make a request outside
the browser and pass in any username they want.
By passing in the accessToken, we allow our backend to verify it and securely determine which user made the request.
Finally, we’ll update the Component that calls createComment:
// Display a different message to logged in users vs logged out
function CreateComment(props) {
if (props.isLoggedIn) {
return <CreateCommentLoggedIn accessToken={props.accessToken} />
} else {
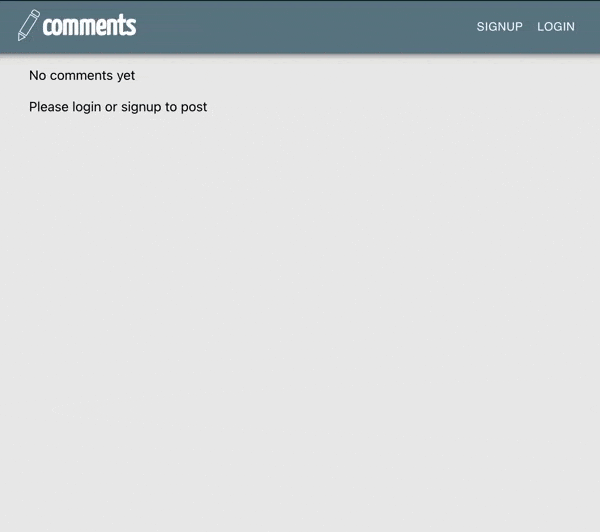
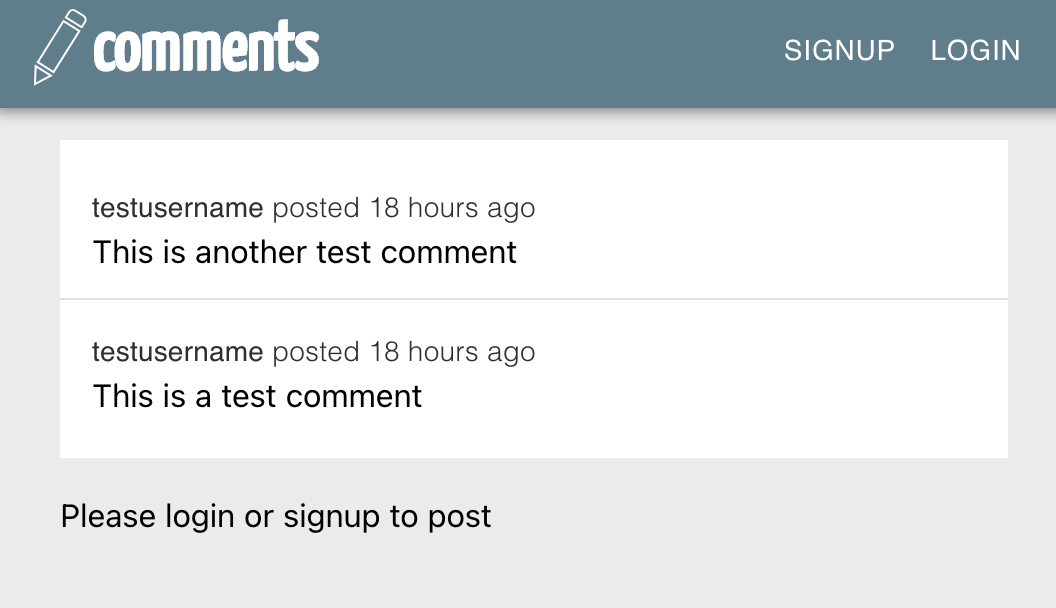
return <div>Please login or signup to post</div>
}
}
function CreateCommentLoggedIn({accessToken}) {
// ... same as the old component
// ... only difference is here
await createComment(accessToken, text)
// ... and we remove the username textbox
}
// withAuthInfo can take a JSX element to display while it fetches auth info
export default withAuthInfo(CreateComment, {
displayWhileLoading: <CircularProgress />
})
Updating the Backend#
Our frontend is now complete. The main change is that we don’t pass in usernames anymore. Let’s update the backend to handle this change.
Updating our DB Schema#
Previously, we were saving usernames to our database. This was reasonable when it was the only piece of information we had about the user, but it doesn’t easily allow for things like a user to change their username.
We’ll update the schema to remove the username column and add a userId column. userId’s are provided by
PropelAuth and will not change for a given user, even as they update information about their account.
const Comment = sequelize.define(
    "Comment",
    {
        // ... same as before
        // ... remove username and replace with
        userId: {
            type: DataTypes.TEXT,
            allowNull: false,
        },
    },
    // ... same as before
)
If we wanted to preserve our existing comments, we’d need to be more careful here.
For this example, we don’t care about preserving data, we can just delete the db.sqlite file and
start over with the new schema.
Protecting our APIs#
Install PropelAuth’s Express library:
$ cd backend
$ yarn add @propelauth/express
# or npm install --save @propelauth/express
Go to the Backend Integration section of your dashboard. You’ll see your Auth URL and you can generate an API key.
Then, we’ll create a new file backend/src/propelauth.js with these parameters.
const propelAuth = require("@propelauth/express")

module.exports = propelAuth.initAuth({
    authUrl: "REPLACE_ME",
    apiKey: "REPLACE_ME",
})
This will validate the authUrl and apiKey and export a bunch of useful auth utilities.
Looking at our routes (in backend/src/index.js) next, we want to protect only the route that creates comments,
which we can do with the requireUser middleware.
const { requireUser } = require("./propelauth")
// ...
// requireUser middleware protects this route.
// Only valid users will be handled, everyone else gets a 401
app.post("/comments", requireUser, async (req, res) => {
    // ... validation logic
    // requireUser automatically sets req.user, which has a userId
    await createComment(req.user.userId, req.body.text)
    res.status(200).send()
})
This middleware checks for a valid access token in the Authorization header (exactly what we specified on the frontend).
Our POST /comments route will now only work if you pass in a valid access token. We can verify this by running
the server and using curl without an access token to test the endpoint.
$ curl -X POST http://localhost:3001/comments -H 'Content-Type: application/json' -d '{"text":"this is a test"}'
Unauthorized
Fetching additional user data#
Our frontend expects usernames, but we are only storing userIds. This is easy to address by fetching usernames
from PropelAuth when we need to serve them to the frontend (in backend/src/comments.js)
const { fetchBatchUserMetadataByUserIds } = require("./propelauth")

async function listAllComments() {
    const comments = // ... query the database, same as before
    return fetchAndAddUsernames(comments)
}

async function fetchAndAddUsernames(comments) {
    // Only get unique userIds
    const userIds = [...new Set(comments.map((comment) => comment.userId))]

    // fetch a dictionary from userId -> metadata which includes username
    const userIdToUserMetadata = await fetchBatchUserMetadataByUserIds(userIds)
    return comments.map((comment) => {
        return {
            ...comment,
            username: userIdToUserMetadata[comment.userId].username,
        }
    })
}
Summary#
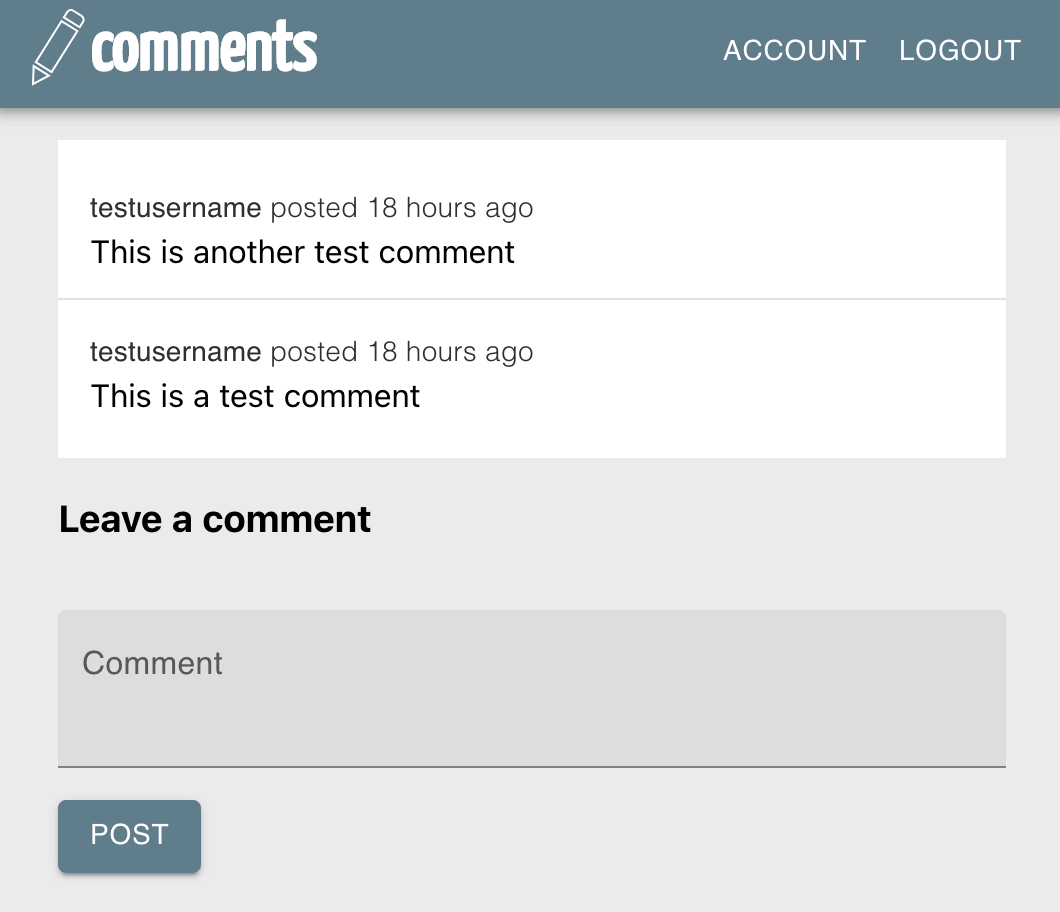
And we are done! When we are logged in, we see:
And when we log out, we see:
To summarize the steps needed to add authentication to your app:
-
Create a PropelAuth project and configure your hosted pages
-
[Frontend] Use
withAuthInfoto distinguish logged in vs logged out and get an accessToken. -
[Frontend] If you want to know who made a request, pass the accessToken in the
Authorizationheader. -
[Backend] Use
requireUserto protect routes.req.userwill be set, and you can save/load information by the unique identifierreq.user.userId.
Advanced features#
We have successfully added authentication to our app. However, there are other tools we could use for more advanced applications. Here are a few examples
Users can edit/delete their own comments#
We used the Express middleware requireUser to protect our POST /comments endpoint and didn’t bother protecting
GET /comments.
There is another middleware optionalUser which sets req.user if a valid access token is provided,
but still allows the request to continue if a valid access token isn’t provided.
With optionalUser we can set up GET /comments to mark which comments were created by the current user. On the
frontend we can display edit/delete buttons for a users own comments.
Social login#
The Social login section of your project allows your users to login with social providers instead of username/password. You won’t need to make any code changes to enable it. Since authentication happens on the hosted authentication pages, you also don’t need to worry about managing the OAuth flow.
Enter your social client ID + client secret, click enable, and you are done.